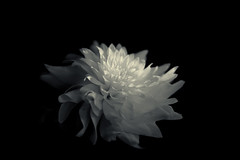
A fun experiment in lighting and then in cross toning during post processing. I think it turned out pretty well.
Monday, September 07, 2009
Friday, May 22, 2009
This has NOT been the week for technology - I should have stayed in bed and forsworn touching any computers all week long. I had just written a rather longish posting detailing the image taking and processing details when flickr/blogger ate it due to a password snafu created as an unintended consequence earlier in the week. Grrrrrr. I will try to recreate the post again. dtr.
---
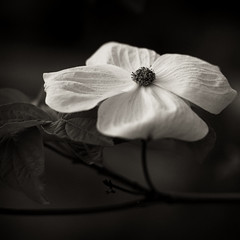
This image of a Dogwood tree flower was taken at dusk on 17 May 2009 at Pickering Farm in Issaquah, Washington. It was taken, handheld, using a Canon 5D mk II and a Canon EF 50mm f1.4 lens set up at ISO 250, 1/160 second shutter speed at f2.5. This is a small crop from a much larger image, though this crop was the image pre-visualized when photo was taken.
I had always thought of dogwood flowers as rather slick and plastic but after spending an hour photographing them it's apparent they are really quite nice little studies in petal drapery: ridges, folds, swells and bumps with a ton of very nice wrinkled cotton-y sort of texture. So much for observations while driving.
Processing-wise this image followed a reasonably normal route in Photoshop, beginning with a Layers adjustment layer to bracket the tonal bandwidth, followed by a very slightly downwardly convex Curve layer to bump up the contrast in the low to middle mid-tones.
Next came conversion to black and white using the most excellent Nik SilverEfx (AgEfx) package. That tool has very decent set of film profiles including one for an Agfa ISO 100 black and white film that has a broad and subtle tonal response that the Kodak and Fuji profiles lack. I'm using that profile quite alot these days and this image was no exception. While in the AgEfx package, I also dialed back the exposure about 1.5 stops, and applied a very mild cyan-ish filter to bump the contrast in the upper to middle shadow range. Finally, before exiting, I gently burned the top, bottom and left edges to enhance the vignetting of the blossom.
Emerging from AgEfx tool, another Levels adjustment layer was applied to set the One True Black Point. I didn't see any value in setting a One True White Point because the histogram already extended to the far right end of the range. Next came another curve layer, this one a very mild 'S' shaped to extend the contrast a little bit more.
Toning came next, with a combination of three washes. The first layer was set up as a duotone to echo the colors in a Silver Gel image, though with a very high transparency. The result of this was to just kiss the petal tops with a very, very slight yellowy tint. This was followed by a greenish gray Platinum duotone and a subsequent brownish gray Platinum duotone layers to give substance and tonality to the mid-range and shadow tones. These washes give the final image a very slight tritone look with whites, very very pale yellows in the lower highlights and greenish-brown deep shadows darkening to true black.
As is normally the case, the image was then sharpened in a mild way with the Photoshop Smart Sharpen function, resampled to 72 dpi and reformatted to jpeg for display on the web.
Looking at the image now, I'm relatively pleased by most aspects of it. Compositionally, I wish that the flower petals were less square to the viewer and at more of an angle. This would, perhaps, give the image a bit more energy, though this arrangement, as it sits, has a certain serene quality to it. This shooting angle also preserved that tasty bit of reflected light bouncing off the petals back onto the surfaces of the leaves at the left that would have been lost with a more oblique view. The diagonals and curves of the lower branches also tend to give the eye some natural direction as well. Tradeoffs and more tradeoffs...
As you might expect after so much futzing with toning, the image looks best on a calibrated monitor where the various grays really emerge. I tried about five or so different combinations of tonal washes, including some colder blue gray / Selenium looks to get something new and interesting. Eventually, I wound up with the Ag gel - Pt - Pt sequence. If I were to go back in I think I'd probably ramp the Ag gel wash transparency back slightly more to about 8 or 10%. Novelty, in the form of the Ag gel toning, is coming slowly to my toning preferences.
I'm getting quite happy with the combination of the 5D and the fast 50mm lens. While the near focusing distance is uncomfortably far as yet, I'm having a lot of fun with it and it's contending as a replacement for my beloved 20D / 35mm f3.0 combination.
This image is good enough to be added to one of the Botanical folios on the PacificaPhoto.net site and so prints will be offered for sale from there soon. As always, your comments and criticisms are encouraged. if you do want a print, they are available by contacting me at the email address listed on the PacificaPhoto site.
---
This image of a Dogwood tree flower was taken at dusk on 17 May 2009 at Pickering Farm in Issaquah, Washington. It was taken, handheld, using a Canon 5D mk II and a Canon EF 50mm f1.4 lens set up at ISO 250, 1/160 second shutter speed at f2.5. This is a small crop from a much larger image, though this crop was the image pre-visualized when photo was taken.
I had always thought of dogwood flowers as rather slick and plastic but after spending an hour photographing them it's apparent they are really quite nice little studies in petal drapery: ridges, folds, swells and bumps with a ton of very nice wrinkled cotton-y sort of texture. So much for observations while driving.
Processing-wise this image followed a reasonably normal route in Photoshop, beginning with a Layers adjustment layer to bracket the tonal bandwidth, followed by a very slightly downwardly convex Curve layer to bump up the contrast in the low to middle mid-tones.
Next came conversion to black and white using the most excellent Nik SilverEfx (AgEfx) package. That tool has very decent set of film profiles including one for an Agfa ISO 100 black and white film that has a broad and subtle tonal response that the Kodak and Fuji profiles lack. I'm using that profile quite alot these days and this image was no exception. While in the AgEfx package, I also dialed back the exposure about 1.5 stops, and applied a very mild cyan-ish filter to bump the contrast in the upper to middle shadow range. Finally, before exiting, I gently burned the top, bottom and left edges to enhance the vignetting of the blossom.
Emerging from AgEfx tool, another Levels adjustment layer was applied to set the One True Black Point. I didn't see any value in setting a One True White Point because the histogram already extended to the far right end of the range. Next came another curve layer, this one a very mild 'S' shaped to extend the contrast a little bit more.
Toning came next, with a combination of three washes. The first layer was set up as a duotone to echo the colors in a Silver Gel image, though with a very high transparency. The result of this was to just kiss the petal tops with a very, very slight yellowy tint. This was followed by a greenish gray Platinum duotone and a subsequent brownish gray Platinum duotone layers to give substance and tonality to the mid-range and shadow tones. These washes give the final image a very slight tritone look with whites, very very pale yellows in the lower highlights and greenish-brown deep shadows darkening to true black.
As is normally the case, the image was then sharpened in a mild way with the Photoshop Smart Sharpen function, resampled to 72 dpi and reformatted to jpeg for display on the web.
Looking at the image now, I'm relatively pleased by most aspects of it. Compositionally, I wish that the flower petals were less square to the viewer and at more of an angle. This would, perhaps, give the image a bit more energy, though this arrangement, as it sits, has a certain serene quality to it. This shooting angle also preserved that tasty bit of reflected light bouncing off the petals back onto the surfaces of the leaves at the left that would have been lost with a more oblique view. The diagonals and curves of the lower branches also tend to give the eye some natural direction as well. Tradeoffs and more tradeoffs...
As you might expect after so much futzing with toning, the image looks best on a calibrated monitor where the various grays really emerge. I tried about five or so different combinations of tonal washes, including some colder blue gray / Selenium looks to get something new and interesting. Eventually, I wound up with the Ag gel - Pt - Pt sequence. If I were to go back in I think I'd probably ramp the Ag gel wash transparency back slightly more to about 8 or 10%. Novelty, in the form of the Ag gel toning, is coming slowly to my toning preferences.
I'm getting quite happy with the combination of the 5D and the fast 50mm lens. While the near focusing distance is uncomfortably far as yet, I'm having a lot of fun with it and it's contending as a replacement for my beloved 20D / 35mm f3.0 combination.
This image is good enough to be added to one of the Botanical folios on the PacificaPhoto.net site and so prints will be offered for sale from there soon. As always, your comments and criticisms are encouraged. if you do want a print, they are available by contacting me at the email address listed on the PacificaPhoto site.
Sunday, May 03, 2009

Sunday, April 26, 2009
Saturday, April 04, 2009
Saturday, March 21, 2009
Curls and Textures
This is a reworked image from the archives. Originally take on April 14, 2007 at the Conservatory of Flowers in Golden Gate State Park, San Francisco, California.
The flower was a sort of pinkish coral orange (to my eyes) on a fairly dark green leafy background. My origiinal visualization of the black and white version of this image was to highlight the curl of the petal as well as the diamond mesh texture on the rather extravagant corkscrew by giving them an isolation and careful enhancement of the tonal values in the mids and upper highlights.
As far as processing goes, I began by increasing the vibrance of the raw image before jumping into Photoshop. Next I cropped the image down from the much larger initial photo to set up the composition and concentrate attention on the flower itself. After relatively standard application of Levels and Curves, I used Nik Silver Effects to do the black and white conversion. Within the Nik AgEfx package, I used a very mild pale blue filter to give a bit more contrast to the image, and an Ilford ISO 50 black and white film profile to get a good contrasty tonal range. I also decreased the grain size a bit to keep it from interfering with with fine texture on the cork screw.
After exiting Nik, I applied another Level layer, using my now standard Threshold layer technique to find and set up final light and dark endpoints on the Level histogram. Even still, the lightest part of the petal texture was a bit blown out by about a quarter or third stop, so I selected just that area using the color range selector and then a downward bowed Curve layer to bring down the brightness for those areas just a bit.
Next came burning and dodging to darken a few of the brighter specular leaf highlights in the background and to put a bit of a vignette around the main body of the flower. Instead of the default Photoshop burn and dodge tools, I use the rather more controllable method of overlaying the image with a new layer blended with soft light, and filled with the 50% neutral tone. Then using pure black and white as the foreground and background, (switching as required), and using a soft edged, nearly transparent paintbrush, one can darken or lighten in a gentle, slow, and very controllabe manner.
I'm pretty happy with this image - it's eye catching and the contrast between the rather hard curves of the cork screw and the soft roll of the petal are well differentiated. The goal of showing off the texture difference was fairly straight-forward to achieve though processing, though this didn't occur until the sharpening step. I had hoped to be able to highlight the little white pollen grains on the end of the corkscrew and that too turned out to be relatively easy to do just by watching the levels endpoints in the final levels layer. The bokeh also turned out quite well too.
The only thing I'm mildly chapped about in this image is that depth of field is not quite perfect. Shooting at f3.2, the back of the corkscrew is a little bit out of focus; an f-stop of 3.6 or 4.0 might have been better to get it all in perfect focus yet still isolated from the background.
Tuesday, March 10, 2009
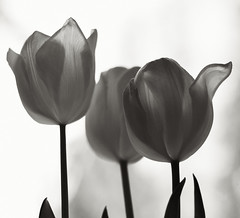
Tulips (Detail)
A rather fun shot of some yellow tulips.
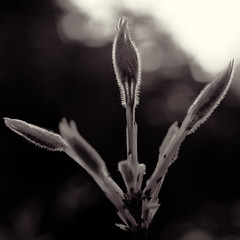
This particular image is a crop from a larger image shot. The lighting is all natural and provided by the sun bouncing off of snow (yes snow in in Issaquah mid March!) to provide uplights off the ground and off of snow covered trees in the background to profide back lighting.
I like this image for so many reason - there is a lot of scale here - from the really delicate ridging and veination of the petals, to the larger geometrics of the flower petals, cups, stems and leaves with lots in between as well. I also like the delicate illumination on the bottom of the flowers providing a rather interesting contrast to the stronger translucent qualities at the top of the petals. The oddly delinquent petal off on the right and the swirl pattern of it's veins really makes the whole shot and keeps it from being just another shot of spring tulips.
Camera wise, the 5D mkII is simply a dream tool for me. This image was taken with an older mark I version of the famous Canon 'nifty fifty' EF 50mm f1.8 lens. There is just so much more of a smooth color gradient available for processing here especially in a 16 byte color space that it's just like playing in butter compared to the range provided by my old reliable Canon 20D.
Processing wise, I went through a series of sketches with this image, looking at Titanium, Titanium-Platinum, and Platinum-Platinum tri-tones before finally settling on the Pt-Pt toning.
The usual adjustment steps of level & curves were followed by conversion to black and white using Nik Silver Efx. Increasingly, I am using an ISO 100 Agfa black and white film simulator. I find it gives me a nice grain and a wide tonal range with which to work. Similar speed films from Kodak produce much darker tones with fewer highlights while those from Fuji and Ilford tend to lighten things up at the expense of richness in the mid-darks.
After conversion to B/W, another round of curves and levels were applied to tweak things back into shape a bit followed by the double Platinum toning steps. Finally, a last bit of spotting and some sharpening (Smart Sharpening, radius, 1.1, value =30) and conversion to jpg were done to produce the final image.
My only issue with this image is the grain - I wish that I had been able to shoot it at lower initial ISO. However for a handheld grab shot it's not too terrible.
As always, comments and critiques are welcomed.
Wednesday, February 25, 2009
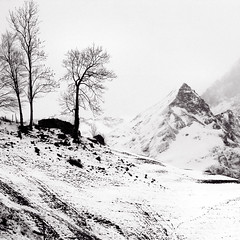
Cold Trees
Another from the Swiss archives, though a square crop from another image. I like the contrast of the tree shapes with the planar mountain form behind. The light brown grey Titanium toning works well for the entire image and I think gives it feeling of cold and winter.
This was definitely one of those "channeling Mr. Adams" sorts of images, turning out pretty much exactly as I had visualized it when I took it.
This was definitely one of those "channeling Mr. Adams" sorts of images, turning out pretty much exactly as I had visualized it when I took it.
Saturday, February 14, 2009
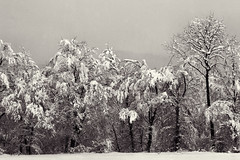
Snow Trees II
This image is one from the Swiss archives. The first weekend weekend in March 2006, I took the train from Luzern to Lauterbrunnen. The intent of the weekend was to visit the Jungfraujoch. While I did make it to the top, it was near white out conditions and photography was less than optimal.
The night before my trip back home to Thalwil there was a deep, wet snow - perhaps 16" or so - that blanketed most of Switzerland and Germany. The led to train delays while the tracks were cleared and transmission wires repaired where necessary. As a result of those delays I was stuck for about fourty five minutes or so on the train near the town of Dulliken not too far outside of Zurich.
These trees formed the edge of the forest not far from the railroad siding in Dulliken. At mid-morning, it was still cold enough and the snow was wet and sticky enough that it had not yet melted off the branches, leaving this delightful treescape.
At the time this was shot, I had not yet understood the advantages of shooting in RAW format and so the original of this image is a jpeg unfortunately. The post processing here was fairly minimal - I was going for a nice white snow against the black trees and a toned sky - so after a basic levelling I took the image into the Nik AgEfx software for black and white conversion. Fooling around with different film profiles led to a 100 speed Agfa film that had a really nice set of grays for this image. My intent was to do my usual double platinum toning but on a lark I tried the Titanium toning profile in the AgEfx software. Whoa - very cool! It made the snow on the trees just glow and brought up the darkly looming shape of the mountain behind really well. After some leveling and a little sharpening, the final image was reformatted to jpeg.
I'm really quite happy with this image. It looks especially good on black and has let me to try reworking a number of my swiss landscapes using the combination of the Agfa film profile and a Titanium toning process.
Sunday, January 25, 2009
Snow Storm Moving Off Tiger Mountain
As frequently the case, snow storms layer across Tiger Mountain in neat strata that are easy to seen. The valley floor is snow free and cloud free. Moving up a few tens of feet and you get into snow and then further up into clouds and snow. Where I live, higher up the mountain, there were clouds and about 1.5 inches of snow.
I was driving by around 2:30 and came on this scene of the snow clouds blowing off the mountain.
Taken near the hang gliding landing field off Issaquah-Hobart Road.

I was driving by around 2:30 and came on this scene of the snow clouds blowing off the mountain.
Taken near the hang gliding landing field off Issaquah-Hobart Road.
Saturday, January 24, 2009
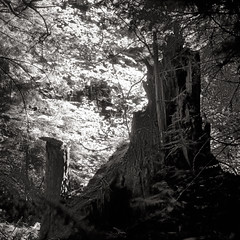
Old Growth Cedar Stump
This image is one I keep coming back to again and again. It was taken in a deep forest in late afternoon in August and so has a rather extreme contrast range. I learned most of my Photoshop skills working on this image, so it's nice to occasionally come back, rework it, and see if I can get any more out if it and/or how my tastes have changed.
I like this version better than any of the previous five versions. The detail in the mid-darks and shadows are much better, the leaves are not quite as washed out and the overall tonal ranger is broader. I think the sharpening is better as well and of course now there is a little grain in there as well as a some fairly extensive burning and dodging.
I like this version better than any of the previous five versions. The detail in the mid-darks and shadows are much better, the leaves are not quite as washed out and the overall tonal ranger is broader. I think the sharpening is better as well and of course now there is a little grain in there as well as a some fairly extensive burning and dodging.
Wednesday, January 14, 2009
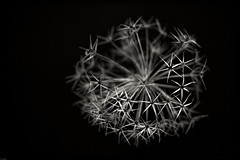
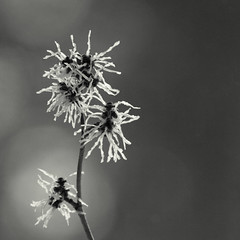
Witch Hazel I detail
During the storms of the last month several branches from the witch hazel shrubs along the property broke off. Over the last couple of days, I snubbed these off, and set them in a vase of water. I dumped in a teaspoon of sugar and an aspirin tablet and lo! bare branches to brightly colored blossoms bursting with fragrance in 48 hours.
Very fun.
Very fun.
Sunday, January 04, 2009

Subscribe to:
Posts (Atom)
